

This is a little tutorial about how to build your own custom DevBox for Deep Learning.

You will find similar builds online so why another one? Just because not all of these builds are up to date with the latest hardware available. For the more expensive components I will try to give a budget option, too.
Alternatively you have the option to buy the NVIDIA DIGITS DevBox for $15k. But if you take the effort you can get more performance for less money. Our custom builds will range between $3k to $9k whereby the pricey build will beat the performance from NVIDIA’s DevBox. Also I’ve included my personal build list.
I don’t want to go deep into performance differences but for a rough orientation here is what you get for your money:
NVIDIA DGX-1 with 170TFlops / $129k => 1.3TFlops for $1k
NVIDIA DIGITS DevBox with 28TFlops / $15k => 1.9TFlops for $1k
Custom-build-1 with 40 TFlops / $9k => 4.4 TFlops for $1k
Budget-custom-build-2 with 16TFlops / $3k => 5.3TFlops for $1k
Again, those numbers are only for an orientation. The NVIDIA DGX-1 for example has capabilities which the other options don’t have (but that’s offtopic). The budget build has the cheapest TFlops but doesn’t scale. The TFlops from NVIDIA DevBox are pricey but it’s not only about hardware you get an “out of the box” working solution with premium support.
Before we continue with the build lists we have to go through some other topics:
- Why so much of NVIDIA where is ATI? For the time being NVIDIA powered graphic cards are the only viable option because of the support of the popular deep learning frameworks.
- Telsa vs Titan? For DNN’s no double precision is needed for graphic cards. The cheaper Titan x and GeForce serieses are sufficient. If you go with GeForce always take the founders edition ( ASUS or EVGA are good options ).
- An important feature is the support of 40 PCIe lanes by the motherboard and the CPU. Your motherboard needs the physical slots and space to support 4 graphic cards with a x8/ x8/ x8/ x8/ setup (4 times x8 == 32 PCIe lanes). Some motherboards do support x16/ x16/ x16/ x16/ but that really doesn’t increase performance.
- CPU performance is less of importance. Double check that 40 PCIe lanes are supported by your CPU. Intel x99 and sockel 2011-v3 with 4 or more cpu cores is fine ( one core for one graphic card ).
- Your main memory (RAM) should be the total of your GPU’s memory plus what you need for your OS (extra 16GB for the OS, more if you run multiple VM’s). You could calculate with twice the GPU’s memory to be save. RAM-Buffer with ECC is not needed, unbuffered is fine.
Ok so far, let’s continue with the real hardware:
Custom-build-1:
- Graphics – 4 x NVIDIA Titan x pascal (not NVIDIA GTX Titan x maxwell )
- Motherboard – ASUS X99-E-10G WS
- CPU – six core i7-6850K LGA2011-v3
- RAM – any manufacture – 64GB DDR4 2133MHz (4x16GB)
- SDD – Samsung PRO 1TB maybe 2TB M.2
- HDD – 8TB disks are cheap… really up to your needs
- PSU – Corsair AX1500i 1500 Watt 80 Plus Titanium 94% energy efficiency
- Cooling – Should be water cooling
- Case: Corsair Carbide Air 540 High Airflow
This build is inspired by the NVIDIA DIGITS DevBox. The components are updated to the successor version. The case is equal to NVIDIA’s, so the Super Flower PSU wouldn’t fit, that’s why I took the more expensive Corsair AX1500i instead.
Budget-custom-build-2:
- Graphics – 2 x ASUS GeForce GTX 1080 founders edition
- Motherboard – Gigabyte X99P-SLI
- CPU – six core i7-5930K LGA2011-v3
- RAM – any manufacture – 32GB DDR4 2133MHz (4x8GB)
- SDD – Samsung 1TB SATA ( not M.2 )
- HDD – 8TB disks are cheap… really up to your needs
- PSU – Super Flower LEADEX 1600 Watt Titanium 94% energy efficiency
- Cooling – Air cooling
- Case: Corsair Carbide Quiet 600Q or Carbide Clear 600C
Note: The PSU is extra long with 220mm, consider this for your case. The CPU is an i7 5th-generation because the motherboard doesn’t support 5th-generation without a BIOS update (with updated BIOS take the i7-6850K instead). The motherboard supports M.2 SDD’s but the port is below the graphic cards and would become hot, take an SATA SDD instead. If you need more performance, then add two more graphic cards and double the main memory.
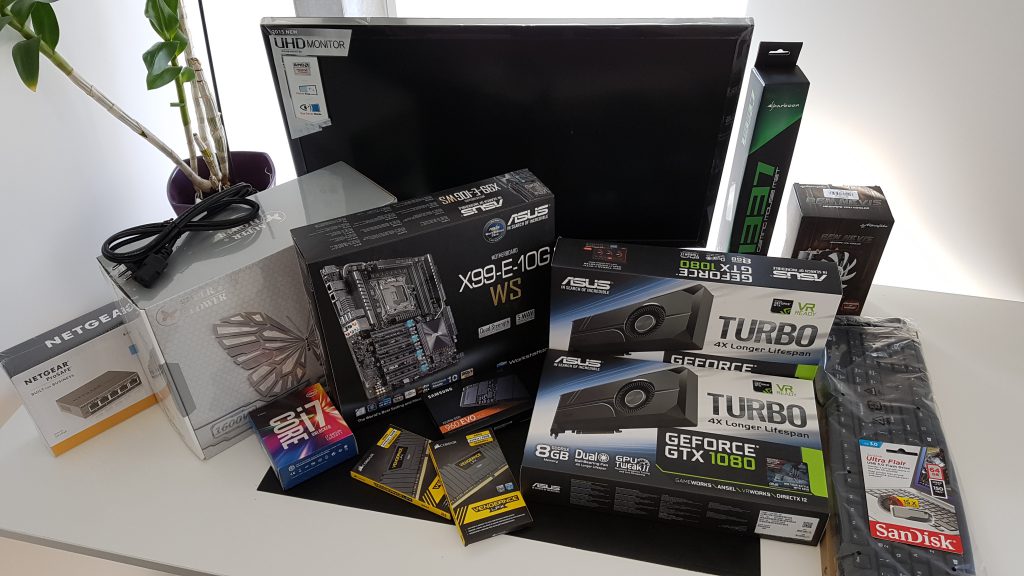
My-build (what I actually bought):
- Graphics – 2 x ASUS GeForce GTX 1080 founders edition
- Motherboard – ASUS X99-E-10G WS
- CPU – six core i7-6850K LGA2011-v3
- RAM – any manufacture – 64GB DDR4 2133MHz (4x16GB)
- SDD – Samsung EVO 1TB M.2
- HDD – 64TB NAS
- PSU – Super Flower LEADEX 1600 Watt Titanium 94% energy efficiency
- Cooling – Air cooling
- Case: Corsair Obsidian 650D
My motherboard supports 10GBit LAN so I’ve decided to put my data on a NAS. It’s planned to add two more graphic cards, that’s why I’ve already put in 64GB main memory. My case choice is the Corsair Obsidian 650D because I already owned one.
I hope my little tutorial did help you. Have fun with your build. Cheers.
( written by Tassilo Waldraff, Head Officer @ CellmatiQ )
2 thoughts on “Building a DevBox for Deep Learning”
What are you storing on each of the disks? I ask because with DNN data is moved in/out of the GPU to/from disk. 10GB NAS will not keep up. Local mechanical disk will not keep up with GPU’s I/O speeds. This is why the Nvidia Devbox is using an SSD cache drive in front of the data storage RAID-5.
Hi Brian,
I’ve all my DNN data for different projects stored on two NAS systems for backup and reliability. I’ve a copy of the actual working data always on my local machine, of course. Without a 10 GBit LAN interface I would consider to skip one or both NAS and put the disks into the local machine to host all DNN data.
How large is your data set? Maybe you can cache all data in your RAM otherwise SSD is your next best option (keep in mind M.2 is much faster than SATA).
Btw: My DevBox tutorial is not up to date anymore.
Cheers Tassilo
Comments are closed.